Hello Followers,
Yes, I haven't posted in awhile but I promise to do so soon.
We took our granddaughter to Hershey Park, Pa. in September. Oct 3rd went to Stowe, Vermont to meet up with brother and his wife, then a week later husband, daughter and I went to Paris, France.
Needless to day, it took this 74 year old some time to recover.
I just began scrapbooking the Hershey Park pictures last weekend, so you can see I have a lot to get done. I have also worked on a couple of holiday gift projects that I will share with you in a later post.
Hope all had a blessed Thanksgiving.
Friday, November 28, 2014
Sunday, August 10, 2014
Soccer Shadow Box

Here's the shadow box I made for my Granddaughter.
Same measurements as the previous posted shadow box.
Pictures are mounted on Mosaic Moments blue grid paper.
The green scrapbook paper, covering all the outer
sides and front of the shadow box, have SOCCER printed all over
as well as layout of playing field and the soccer ball.
# 5 and LIBERTY cut out using Printing 101 Cricut Cartridge.
She was so excited to receive this.
Sunday, July 27, 2014
Shadow Box

I completed this project earlier this month but was delayed posting as my
little garden of squash and zucchini began to produce so I have been super
busy making Zucchini Bread, Zucchini Relish and Squash Bread and
Butter pickles.
Saw one like this in a magazine and thought, "I bet I
can duplicate this". Theirs was a metal box but this was created
using black presentation board and white poster board.
Back and sides are cut from the black board and the front from the
poster board. You can make this any size you wish;
this one happens to be 10" x 10" and 1 inch deep.
Before assembling the shadow box, I glued burlap looking
paper to the back piece then attached the wire. The B was cut using
the Cricut Don Juan Cartridge set at 8 1/2 inches. I layered several B's
to strengthen, then attached with double pop dots. The vine,
rocks, sweet gum balls and pine cone are from the yard. Added
a silk flower and berries and butterflies that were purchased at Michael's.

The sides of the shadow box are covered with scrapbook
paper that has a weathered wood look.
I am so pleased at how quickly this went together that I
am thinking of doing a set to reflect the four seasons.
Till next time.
Saturday, June 7, 2014
Man of the House Card

"Driftwood" paper from Cloud 9 Design, The Woodstone Collection,
gives a rustic look to this Father's Day Card.
"You're # 1" and "MAN OF THE HOUSE" sentiments are Studio G stamped
with Color Box Cocoa ink. The #1 is punched with the 1" scalloped square
from Stampin Up. I also chalked the edges of the white papers with Cocoa ink.
"There is no Thing like A family 's Love" is a sticker from Creative Memories.

Friday, May 30, 2014
Father's Day Card

MoJo Challenge for this week is tall and skinny .
Tools and materials used are;
Stampin Up 2 1/2" circle punch
You're #1 Studio G clear stamp (VC0010 Series 30)
Studio G green pigment ink
Brown Hemp Cord and button
White and green papers

Thursday, May 1, 2014
Watermellon Bunny Centerpiece

After seeing this on Pinterest, I knew I would have to duplicate it.
Was surprised at how easy it was to draw and cut the bunny head and ears,
scoop out the inside then fill with strawberries, blue berries, grapes and
watermelon balls. On Pinterest, they had used white rind to make the
whiskers but I could never get them to stay put without all drooping to far
down so I used white pipe cleaners. Also rolled a pink pipe cleaner into a
circle for the nose. Adhered the whiskers and nose with a hot glue gun. Used grapes
for the eyes. Made for a nice centerpiece on our Easter table.
Just wish he had lasted longer!!!
Thursday, April 10, 2014
Mojo Challenge 340

Materials used;
White card stock 6" x 5 1/2"
Green paper 4 1/4" x 5 3/4"
Plaid paper 3 1/4" x 4 3/8"
Added ribbon and bow to the plaid paper
Creative Memories Reflections paper flowers
adhesive pearls for the flower centers
Eyelet Outlet bunny brad
AC Moore "Happy Easter" sentiment stamp
Color Box Fresh Green ink pad

Happy Easter and thanks for stopping by.
Saturday, March 29, 2014
Mojo Challenge #338
Love the layout for this week's Mojo Challenge. I made my banners using
Washi tape. Cut the circle with a Stampin Up punch then chalked the edges.
The pattern paper is a sheet from Recollections Floral Foliage paper pack.

The sentiment "it's your birthday" is one of 32 in the Verve Stamps TAKE NOTE
VS-0192; my choice as one of the winners of challenge #335.

Sorry, this is not a very clear picture. Took several but they all
turned out the same.

Hope you will enjoy my latest creation.
Friday, March 21, 2014
Scrapbook Pages
I would like to share with you some of the pages I did at the
Sunshine Retreat held in Williamsburg, Virginia this past weekend.

Someone had put this sentiment embellishment on the "Free" table.
and the minute I saw it, I knew the perfect picture to use it with.
Granddaughter in the center with her two best friends.

Then I had to try and duplicate an embellishment for the second page layout.
Between Stampin Up punches and Cricut cartridges I am very
pleased with the end results.
Granddaughter with Mom and Dad

Tulips made using parts from the Stampin Up
Owl punch, chalked the edges of the petals and pop dotted
them in grass that was cut using the Cricut.
Punched out a butterfly, colored in the center with black
Copic marker then added two tiny strips of black for it's antennas.
Granddaughter and my son.

My daughter had given me a packet of 6x6 inch paper
which contained one sheet that looked like stainless
steel which I use to cut out the scissors on my Cricut machine.
Then cut a second pair from black paper to cover the handles.
Letters made with Alphalicious Cricut cartridge.
This are my two granddaughters, age 29 and 10.
Thanks for visiting my blog.
Monday, March 17, 2014
I was a winner
I can't begin to tell all how excited I was to see that my entry (#25)
was selected as one of the winners last week at the Mojo Monday
Challenge Blog. I got the Verve stamp of my choice today
and will be back soon with another Mojo entry using my prize.
Until then, thanks for stopping by.
Monday, March 3, 2014
Mojo Challenge 335

After selecting my shades of green I highlighted the edges of the paper with
a green Copic marker. Added a sentiment banner stamped with one
found in a dollar bin at Michael's. The paper flower is from the Creative
Memories Delightful pack. I had this little shamrock in my stash which
is the perfect finishing touch to this card.

Thanks for stopping by and may the luck of the Irish always be with you.
Sunday, March 2, 2014
February Card Swap
Sorry, Followers, I am a bit late posting pictures from the February Card Swap.
I had orders to knit 13 ruffle scarfs which I just finished up last weekend.
Anyway, we had a wonderful group of cards to assemble.

This lady's card was so colorful as the gray area is glitter paper
then the flowers were cut with her Cricut.

Love the different shape hearts.

Love these color combinations and we had to stamp
all the hearts on the white border paper.
This lady is a Stampin Up Consultant and her cards
are always first class.

I love the little mouse!
This is my card using a floral sentiment stamp form Michael's
then colored in the flowers and butterfly using Copic markers.
The red hearts made with the Creative Memories heart punch.

This card is great for any occasion and especially for a male.
The texture on the brown paper was made with the latest embossing plate
from Stampin Up,which give it a leather look.

I never heard the lady say how this was cut out but love the design.

What a creative idea this was to use the little umbrella,
folded in half then glued in place. We had the choice
to use a pre-printed sentiment or write in, as I did.
Thanks for stopping by and hope you enjoyed.
Wednesday, January 29, 2014
Mojo Monday Tall and Skinny Card
Mojo Monday has switched from
Round or Square layout
for the last challenge of the month
and I love the Tall and Skinny size.

White card stock measures 5.5 x 7"
then score and fold at 3.5".
Cut the pink 3 1/4 x 5 1/4"
Burgundy 1 5/8 x 3 3/4"
Stampin Up Punches for the
large heart and circle.
Piece of black and white ribbon
and a self adhesive Ruby heart from Darico
Finishing Accents.
Sentiment stamped on the 2 1/2 inch circle
is from Impression Obsessions
Valentine set ordered through Tami Potter's website
Wish in the Wind
Valentine Card
Here's another Valentine Card .
Card measures 4x5 with rounded lower edges.
I used the same stamp set, ink and ribbon
as previous card.
White heart border made with a Martha Steward
punch.

I'm off today thanks to the snow storm yesterday
and plan to spend today knitting as I have ten request
from friends to make then a ruffled scarf.
Till next time, happy crafting.
Saturday, January 11, 2014
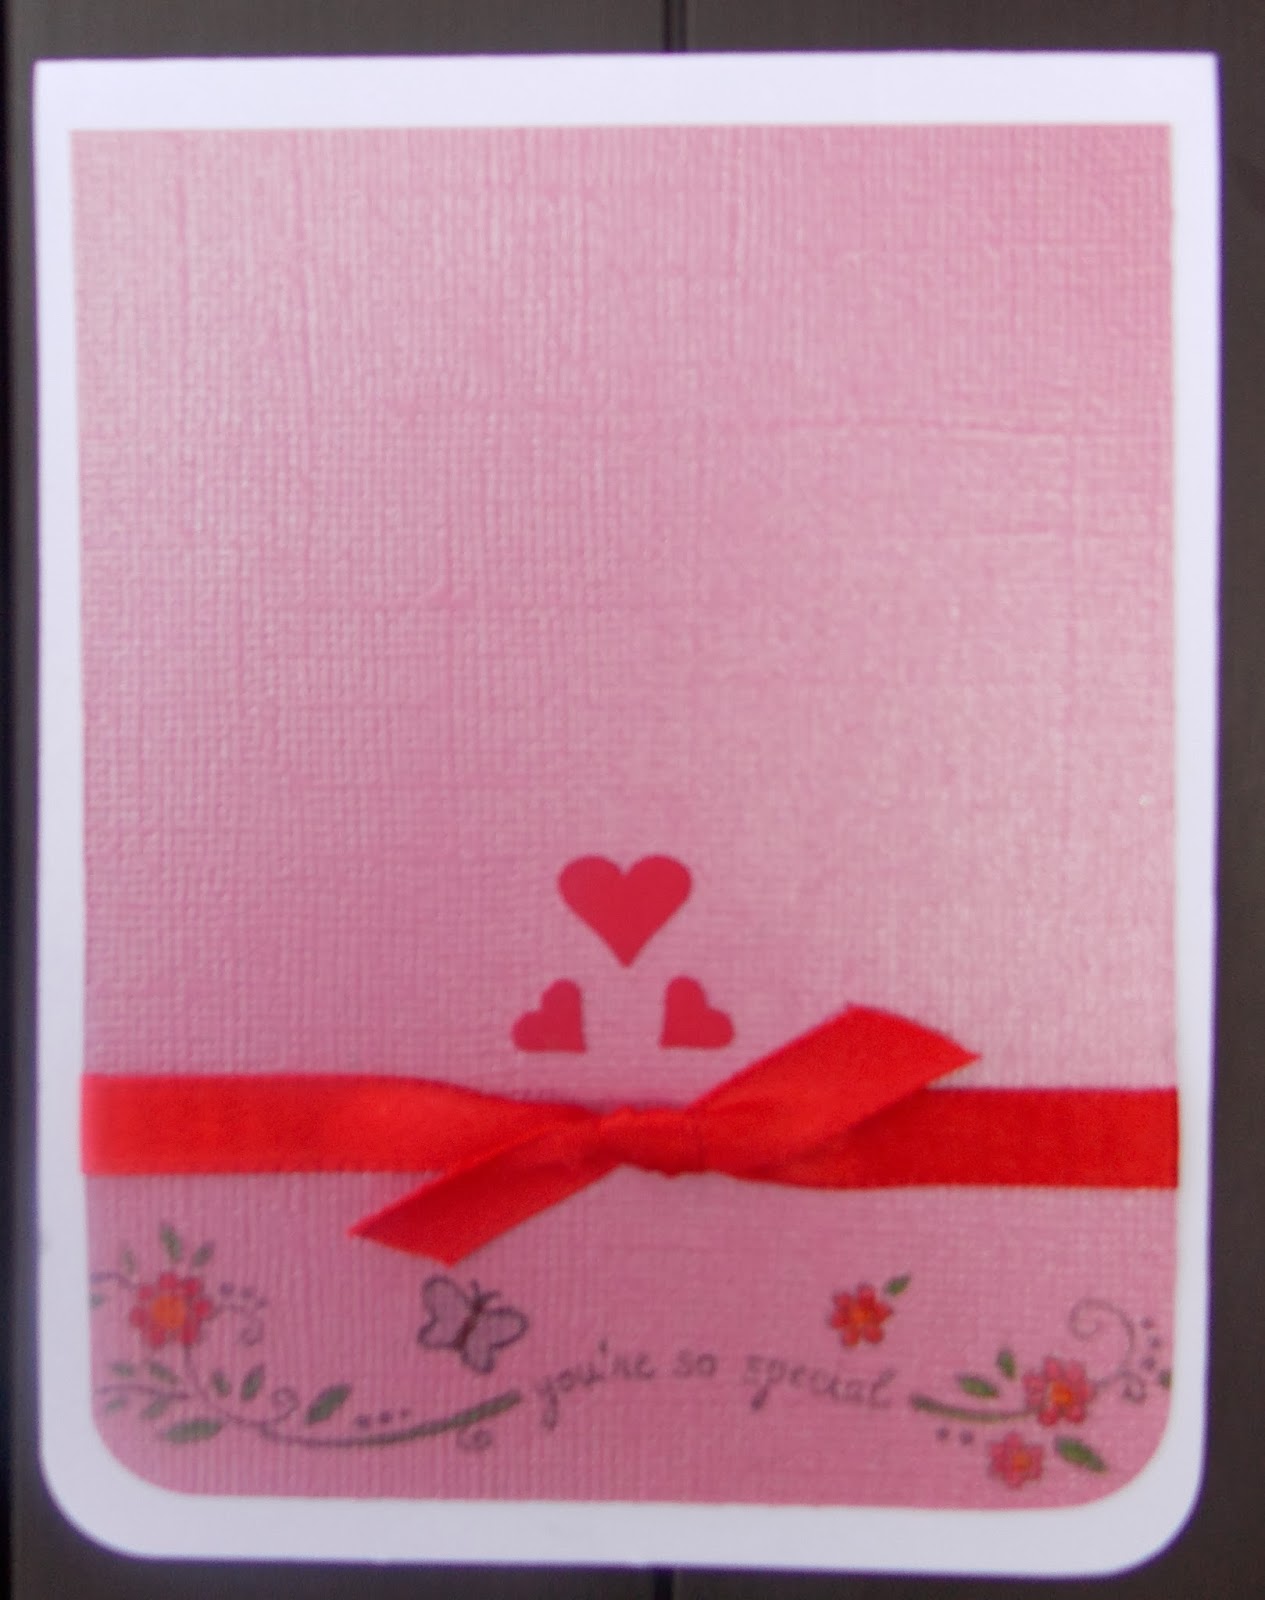
Valentine Card
My groups monthly card swap is coming up Monday night
and here is the card I made for everyone to assemble.

Card measures 4 x 5 and I rounded the bottom corners.
Materials use;
White and pink cardstock
Hearts cut out from Hallmark Between You and Me Cards
3/8" Red Ribbon
Happy Valentine's Day stamp from Inkadinkado
Valentine peg stamp set #9484I
Color Box Scarlet stamp pad
Pop dots
Happy Valentine's Day
Thursday, January 9, 2014
Knitted Ruffle Scarf
I have a new craft to share today.
I finally learned to knit a ruffle scarf that is so popular.

I had tried to do this several years ago and had trouble
getting the first several rows done. But once I got the hang of it,
I knitted five in about a week and am taking
request from friends and family.

Each time I complete one, I swear it's my favorite
------until I complete another.
I began by casting on five loops from behind, then knit
in each loop for a couple of rows; add on three
more loops and continue to knit each row until desired length.
Yard is Starbella purchased at A. C. Moore.
Wednesday, January 1, 2014
Yes, It's been awhile
Sorry Followers, I realize it has been awhile since I posted
but things got rather busy in November and December.
I promise to get back in the swing of things soon.
In the meantime here is a little project I did for Granddaughter's
class at Christmas.

Due to students having so many allergies, our school
system will no longer allow home baked goods or
any types of treats that may trigger allergies. So, I was having a
hard time deciding what to do until I saw the above on Pinterest.
So simple to make . First, I printed the saying on my computer then stamped
the penguin from the Close To My Heart Wintery Wishes
Hostess Rewards set, Item# C1560. The cello bags came from Michael's and were
the perfect size to hold the card and the chap stick fit snug enough to hold it in place
without having to use tape or glue.
I love the saying and these were a great hit with her classmates for this is something all
can use during these cold winter months
I wish all a very Happy and Healthy New Year.
Subscribe to:
Posts (Atom)